A Step-by-Step Guide to Personalizing Your AWS Management Console with Colors, Regions, and Services
Introduction
Are you tired of scrolling through a long list of AWS Regions and services every time you log in to the Management Console? Do you manage multiple AWS accounts and wish you could tell them apart at a glance? AWS now offers a robust User Experience Customization (UXC) capability that lets you tailor the console interface to your workflow. You can assign a distinct color to each account for quick visual identification, and choose exactly which AWS Regions and services appear in your navigation menus. By hiding unused items, you reduce clutter, minimize clicks, and improve focus. This guide walks you through every step to set up account colors, hide irrelevant Regions, and streamline your services menu—all from the unified settings panel.
What You Need
- AWS account with administrative permissions (to access Account settings tab)
- AWS Management Console access (web browser)
- Basic familiarity with the console menu and navigation bar
Step-by-Step Instructions
Part 1: Set an Account Color for Easy Visual Identification
Assigning a color to your AWS account helps you immediately distinguish between development, test, and production environments, or between different departments.
- Sign in to the AWS Management Console. Open your preferred browser and log in with your credentials.
- Click your account name on the top navigation bar (upper right corner). A drop-down menu appears.
- Choose "Account" from the drop-down menu. This opens your account settings page.
- Locate the "Account display settings" section. You will see an option to set an account color. If you haven’t set one yet, it will show "Not set yet."
- Select your preferred color from the palette. For example, use orange for development, light blue for testing, and red for production.
- Click "Update" to save your choice. The navigation bar now displays your chosen color next to the account name.
Tip: You can change the color anytime by repeating these steps. The color appears only in the Management Console—it does not affect billing or access permissions.
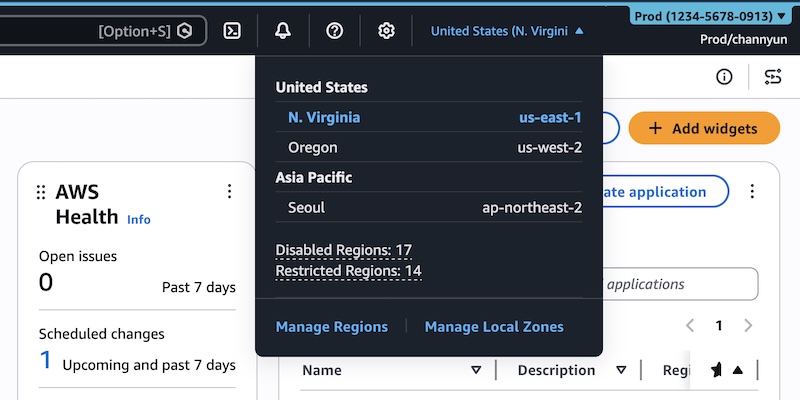
Part 2: Customize Which AWS Regions Are Visible
By default, all AWS Regions appear in the Region selector. If your team works only in a few Regions, hiding the rest reduces cognitive load and prevents accidental launches in unintended locations.
- Click the gear icon on the navigation bar (usually next to your account name). Then select "See all user settings" from the menu.
- If you are an administrator, you will see a new "Account settings" tab in the unified settings page. Click it. (If you don’t see this tab, contact your account administrator.)
- Find the "Visible Regions" section and click "Edit".
- Choose either:
- "All available Regions" to keep the default behavior, or
- "Select Regions" to pick specific ones. When you choose this, a list of all Regions appears. Check the ones you want to remain visible.
- Click "Save changes". Now the Region selector on the navigation bar will show only the Regions you selected.
Note: This setting controls visibility only in the console—it does not restrict access via AWS CLI, SDKs, APIs, or Amazon Q Developer.

Part 3: Customize Which AWS Services Appear in the Navigation Menu
Just like Regions, you can trim the services list to show only the ones you frequently use. This eliminates endless scrolling through the "All Services" menu.
- Stay on the same "Account settings" tab (reached via gear icon → See all user settings → Account settings).
- Scroll to the "Visible Services" section and click "Edit".
- Pick services using the search box or by browsing categories (e.g., "Popular services"). Select the services you want to appear in the All Services menu.
- Click "Save changes". Return to the main console; the All Services menu now only lists your chosen services. When you use the search bar, only those services will appear in the results.
Tip: You can always revert to showing all services by editing again and selecting "All services" at the top of the list.
Tips for Best Results
- Name your accounts color-codedly to reinforce visual cues: For example, use red for production, yellow for staging, and green for development.
- Coordinate with your team to ensure consistent Region and service visibility settings across the organization, especially if you use centralized administration.
- Remember that hidden Regions and services are not blocked—the console simply hides them from the UI. Users can still access them through CLI, SDKs, or direct API calls. For access control, use IAM policies.
- Review settings periodically as your workload evolves. New Regions or services may become relevant, and you may want to add them back.
- Use the unified settings page (gear icon → See all user settings) for all customization in one place, instead of navigating through multiple menus.
By personalizing your AWS Management Console with account colors and selective Region/service visibility, you create a cleaner, faster workspace that matches your daily tasks. Start today and experience a more focused cloud management environment.