Introduction
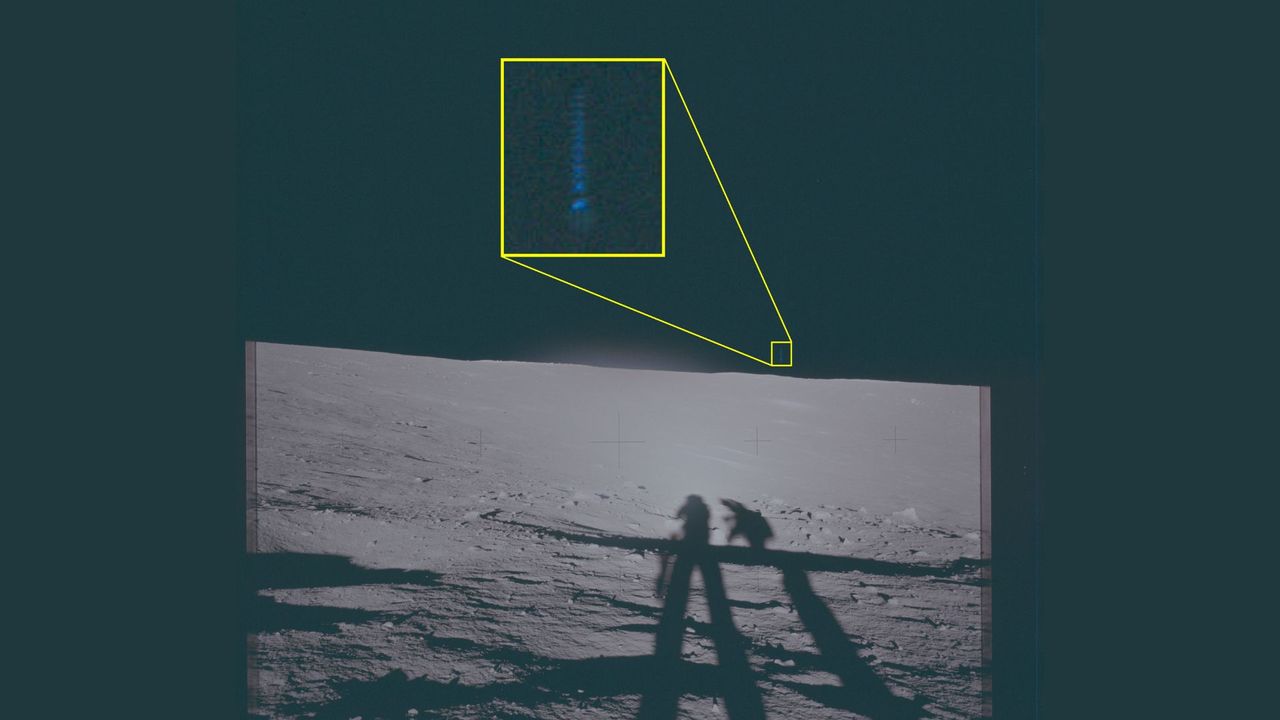
Ever since the Apollo missions brought back stunning photos from the lunar surface, amateur and professional investigators have pored over them looking for anomalies. In particular, recently declassified images from Apollo 12 have sparked renewed interest due to strange, unidentified lights spotted by astronauts. This guide will walk you through the process of obtaining, analyzing, and interpreting these historic photos—whether you're a space enthusiast, a UFO researcher, or just curious about what might be lurking in the shadows of the Moon. By the end, you'll have a systematic method to evaluate any declassified lunar image for potential unexplained phenomena.
What You Need
- Reliable internet connection – for downloading high-resolution scans of Apollo 12 images.
- Computer or tablet – a device with enough processing power to handle large image files.
- Image viewing/editing software – free tools like GIMP, IrfanView, or even built-in Windows Photos app. Advanced users may prefer Photoshop.
- Reference documents – NASA mission logs, astronaut transcripts, and original photo catalogs (available online).
- Note-taking app or notebook – to record observations and comparisons.
- Patience and an open but skeptical mind – avoid jumping to conclusions; cross-check every anomaly.
Step-by-Step Guide
Step 1: Locate and Download the Declassified Apollo 12 Images
Start by finding the official sources. The Apollo 12 images were taken by astronauts Charles Conrad Jr. and Alan L. Bean during their November 1969 mission. Many are stored in the Lunar and Planetary Institute (LPI) and NASA Johnson Space Center online archives. Use keywords like "Apollo 12 Hasselblad images" or "Apollo 12 panoramic photos." Look for high-resolution .tif or .jpg files (preferably 600 dpi or higher). The declassified set specifically includes frames showing unidentified lights—often referred to as "UFOs" by enthusiasts. Save them in a clearly named folder for analysis.
Step 2: Organize the Images by Sequence and Context
Don't just randomly open images. Apollo 12 photos were taken in sequential rolls. Find the mission timeline online (e.g., from Apollo Lunar Surface Journal). Group images by the astronaut who took them, the time of day (lunar day/night), and the location (e.g., Oceanus Procellarum). This context helps you later determine if a light source could be a reflection, a spacecraft part, or an artifact. Note the camera settings (aperture, shutter speed, film type) if available—these affect exposure and can create false positives.
Step 3: Visually Scan for Anomalies
Open each image at full resolution. Use the zoom tool to slowly scan the entire frame. Look for:
- Small bright points that are not stars (stars are usually pinpoints; anomalies may have halos or irregular sizes).
- Objects with symmetrical shapes or right angles (natural lunar rocks are usually irregular).
- Lights that appear to hover above the surface (check shadows—if the object casts a shadow, it's likely a natural rock or equipment).
- Colored streaks or lens flares (these could be camera artifacts).
Circle suspicious areas with your image editing software. Don't save over the original; use layers or annotations.
Step 4: Enchance the Image to Reveal Hidden Details
Use basic enhancement techniques to bring out faint features:
- Adjust brightness/contrast – increase contrast to make subtle lights stand out.
- Curves or levels – tweak the histogram to bring out details in shadows.
- Unsharp mask – apply a light amount to sharpen edges.
- Color correction – some anomalies appear only when you isolate certain color channels.
Important: Save a copy of the enhanced image separately and note the exact adjustments you made. This ensures reproducibility.

Step 5: Compare with Known Artifacts and Lunar Features
Before declaring a sighting, rule out common explanations:
- Thermal noise or sensor dust – if the anomaly appears on only one frame and in the same spot each time, it's likely a camera defect.
- Reflections from sunlight on astronaut equipment – the Apollo 12 crew carried reflective tools and suits; check if the anomaly is near a metallic object.
- Plastic debris or lunar module parts – jettisoned parts often float in space and can be photographed.
- Stars and planets – use a star map (e.g., Stellarium) for the time and location to see if Venus or Jupiter was visible.
Cross-reference your findings with the mission transcripts—astronauts sometimes comment on strange lights.
Step 6: Analyze the Timing and Sequence of Multiple Frames
A single anomalous dot could be anything. But if you find an object that appears across several consecutively numbered frames, moving in a straight line or changing position, that's more compelling. Extract the exact coordinates (pixel positions) of the anomaly in each frame. Calculate the approximate angular velocity if you know the time between frames (usually 1–2 seconds). For Apollo 12, the astronauts often bracketed exposures. A moving object that does not match the movement of the spacecraft (which was stationary on the surface) could be genuine.
Step 7: Share Your Findings and Seek Peer Review
Post your analysis on reputable forums like Space.com, Universe Today, or the NASA Spaceflight Forum with a clear description of your methods. Include unaltered and enhanced versions. Invite others to replicate your work. Many "UFOs" turn out to be known lunar rocks or lens flares after community examination. If your anomaly withstands scrutiny, you might contribute to genuine scientific curiosity.
Tips for Success
- Always start with the original, unenhanced image. Enhancements can create artifacts that look like UFOs.
- Learn the basics of lunar geology. Knowing what rocks and craters look like helps you avoid false alarms.
- Be cautious of confirmation bias. It's exciting to find a UFO, but most have mundane explanations.
- Use multiple sources for the same image. Sometimes scans differ; compare from LPI and NASA.
- Keep a log of every analysis step – if you ever publish, you'll need it.
- Respect the astronauts' legacy. They were scientists and explorers, not cover-up artists.
By following these steps, you'll be able to conduct a serious, systematic investigation of the declassified Apollo 12 images. Whether you discover a genuine lunar anomaly or just a grain of dust on the film, the process itself is a rewarding exercise in critical thinking and space history. Happy hunting!